Sunday, May 24, 2020

How to show blogger Post content in Search Engine


This is the best SEO technique for blogspot to show your blog content or summary about your blog post in search engine. This summary that appear in search engine helps the user to understand about the content of the page. As you can see our screen shot below a summary of my blog content about my post.


Steps How to show your blog post content in Search Engine.

1. Under you blogger dashboard
2. Go to "Posts"
3. Create a "New post" or select a post to edit
4. At the right side under view the Post settings click "Search Description" and box will appear
5.Now write your own summary about the content of your blog post. Best practices about writing summary should not exceed in 150 characters
6. Click Done and Save for edited post or Publish for New post.   

Here is my example about creating a summary of a blog content or post.

A simple note:
Write a accurate description about the content of your post and avoid  misleading meta tag description that has no relation to your blog content.


I you like our post please share and subscribe.

HTTP INJECTOR TUTORIALS Updated: May 25, 2020


A complete tutorial on how to use HTTP Injector like Payload,Remote Proxy, SSH Account and Creating Config

Table of contents:
1. Payloads
2. Remote Proxy
3. Creating Account
4. Creating Config.
5. Making Ehi file

1. PAYLOADS


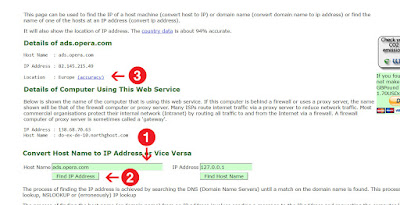
1. First search the site first after you've got a copy of your website address and go to this link Click Here

 Sample "opera.com"


1: This is where you put the website so that you can check who the hosts are on the same server on that website.
2: Click check and wait
3: These are the outgoing sites hosted on the same server, copy them.

Go to this link to check the response status of websites Click Here


4. Here you put your copied websites out earlier. can be plural. 1 per line means every website you enter.
5. Submit and wait for the response to appear
6. These are the responses that go to websites. Those 200 are the ones we are looking for in the payload

Find the location of the Website Click Here


1: Here you put the web address 200 results (one at a time)
2: Click submit
3: Result indicates jan if that location


2. REMOTE PROXY

Step 1: Visit these websites. It's just that I know of many sources that are "GOOGLE IS YOUR FRIEND".
https://proxy-list.org/
http://spys.ru/
http://www.gatherproxy.com/


Step 2: choose low latency or response time or high speed. You decide


Step 3: Check the proxy you have selected using this link Click Here


1. Here you put the remote ip ad
2. The proxy is here
3. Click the hat
4. This is the result. for no hassle you look for pure green. Available in any type

Find the IP location Click Here


Sometimes I prefer the SQUID PROXY where you register, just look at what country your account is.


3. CREATING ACCOUNTS

Best site to create ssh account:
http://mytunneling.com/
https://fullssh.com/
https://fastssh.com/

Our sample is https://fullssh.com/


1: Select Region wherever you want as long as you have free slots
2: Select you Country (Choose fast)
3: Create an account
4: Username
5: Password
6: Capcta
7: Click Register
8: Account details
9: Wait until 100%
Save the details because you have the option

4. CREATING CONFIG

First download HTTP Injector for PC
Overview of HTTP Injector in PC


1: Generate payload
2: Remote proxy and port
3: SSH Tab Account, here we will enter the details previously displayed after registration
4: host
5: Port
6: username
7: Password

Previously we registers and shows the details that you must save for free, this image is the details to be put into the SSH Account

 Generate Payload
  1. This is where you put the 200 website response earlier
  2. Normally "CONNECT" is used by most so just connect with me
  3. Injection type because I connect and work the payload and remote proxy "NORMAL INJECTION I LOOK"
  4. Most X-Online-Host, Keep Alive, User-Agent is used so basic first so here we go
  5. Click generate
  6. After generating Payload you put the proxy you are working on, You have already found all the green for no hassle to connect. and clickt start, that's it .. You must be connected to internet normally pocket wifi.

 5. MAKING EHI FILE

Previously we registers and shows the details that you must save for free, this image is the details to be put into the SSH Account
Download HTTP Injector apk in google playstore

Step 1. SSH Setting


1. Goto SSH Settings
2. Input the required account like SSH Host, SSH PORT, Username and Password.

Step 2. Payload

200(OK) Setup
(For Smart/TNT/Sun)
Connection Established Setup
(For Smart/TNT/Sun)
Globe/TM Default with Promo


Step 4. Remote Proxy


For beginners: Use the SSH Host IP that your created in your SSH account with the default por 80,81 and 8080.
For Advance User: Use a working Remote proxy.


Note: This is very important

  1. This tutorial is for Globe and TM just a few tutorials for Smart / TalkandText
  2. We have to register with SULITXT5 or COC5 on TM for no capping for 2 Days, and SULITXT for Globe but with globe capping
  3. If your payload is your country, your remote proxy's country is also high, if your IP and HOST address is disclosed.
  4. Don't try to scream at FB for free internet because it might kill you again.
  5. Always click thanks to the main thread for those who like to post, because it can be hard to wait for 1am (RESET TIME) while those who are waiting for a good night's sleep, do the config monitoring, go ahead thousands of registrants just for fun have something to share with you for free.


Activating Microsoft Office 365 without using product key or any activator Update May 25, 2020


How to activate Microsoft Office 365 without using a product key or any activator

Requirements:
1. Power Tools or Daemoon Tools
2.  Office 365 Pro Plus ISO (Link below)

Step 1:
Download Office 365 Pro Plus ISO
Office 365 Pro Plus: 
https://tb.rg-adguard.net/dl.php?go=287bd637
or
http://officecdn.microsoft.com/db/492350F6-3A01-4F97-B9C0-C7C6DDF67D60/media/en-US/O365ProPlusRetail.img

Office 365 Business: https://tb.rg-adguard.net/dl.php?go=beceea13

Office 365 Home Premium: http://officecdn.microsoft.com/db/49...PremRetail.img

After you download the file install it.

Step 2:

Copy the text code below from @echo off to pause >null and save Activate.cmd or any filename.cmd. If you are using windows 10 save as .bat


@echo off title Activate Office 365 ProPlus for FREE - MSGuides.com&cls&echo ============================================================================&echo #Project: Activating Microsoft software products for FREE without software&echo ============================================================================&echo.&echo #Supported products: Office 365 ProPlus (x86-x64)&echo.&echo.&(if exist "%ProgramFiles%\Microsoft Office\Office16\ospp.vbs" cd /d "%ProgramFiles%\Microsoft Office\Office16")&(if exist "%ProgramFiles(x86)%\Microsoft Office\Office16\ospp.vbs" cd /d "%ProgramFiles(x86)%\Microsoft Office\Office16")&(for /f %%x in ('dir /b ..\root\Licenses16\proplusvl_kms*.xrm-ms') do cscript ospp.vbs /inslic:"..\root\Licenses16\%%x" >nul)&(for /f %%x in ('dir /b ..\root\Licenses16\proplusvl_mak*.xrm-ms') do cscript ospp.vbs /inslic:"..\root\Licenses16\%%x" >nul)&echo.&echo ============================================================================&echo Activating your Office...&cscript //nologo slmgr.vbs /ckms >nul&cscript //nologo ospp.vbs /setprt:1688 >nul&cscript //nologo ospp.vbs /unpkey:WFG99 >nul&cscript //nologo ospp.vbs /unpkey:DRTFM >nul&cscript //nologo ospp.vbs /unpkey:BTDRB >nul&cscript //nologo ospp.vbs /inpkey:XQNVK-8JYDB-WJ9W3-YJ8YR-WFG99 >nul&set i=1 :server if %i%==1 set KMS_Sev=kms7.MSGuides.com if %i%==2 set KMS_Sev=kms8.MSGuides.com if %i%==3 set KMS_Sev=kms9.MSGuides.com if %i%==4 goto notsupported cscript //nologo ospp.vbs /sethst:%KMS_Sev% >nul&echo ============================================================================&echo.&echo. cscript //nologo ospp.vbs /act | find /i "successful" && (echo.&echo ============================================================================&echo.&echo #My official blog: MSGuides.com&echo.&echo #How it works: ????????kms-server&echo.&echo #Please feel free to contact me at msguides.com@gmail.com if you have any questions or concerns.&echo.&echo #Please consider supporting this project: donate.msguides.com&echo #Your support is helping me keep my servers running everyday!&echo.&echo ============================================================================&choice /n /c YN /m "Would you like to visit my blog [Y,N]?" & if errorlevel 2 exit) || (echo The connection to my KMS server failed! Trying to connect to another one... & echo Please wait... & echo. & echo. & set /a i+=1 & goto server) explorer "http://MSGuides.com"&goto halt :notsupported echo.&echo ============================================================================&echo Sorry! Your version is not supported.&echo Please try installing the latest version here: ????????odt2k16 :halt pause >nul


Step 3: Run the file you save as Administrator.
Done! You Office has been activated successfully. Please check activation status again.
 You check the activation status again.


Step 4: Open your Office 365 WORD then click "File" in tab menu (upper life side).
Step 5: Choose "Account" then you can see your Office 365 Pro Plus is status is activated.


Saturday, May 23, 2020

Elementor Pro Latest Free Download May 25, 2020


WordPress Elementor pro plugin is an Exact Copy of Elementor pro Plugin distributed by Elementor. Here you can download free Elementor Pro plugin under GPL license. Educational purpose only. No registration needed or no subscription. For commercial Purpose we highly recommend purchase from Developers.

Freethub is not affiliated or in any way to related third-party developers or trademark owners, including: WordPress, WooCommerce, WooThemes, Yoast, etc.

When the Developers release a new version of the plugin/theme, we will share and you can download it free from freethub.

Elementor pro is best and unique page builder was created in seo mind. whoever don’t know coding? Then elementor pro is best choice for beginners. Easy drag and drop elements with live preview. Directly you can edit text or image on elementor pro editing page.

Elementor Pro Live Form Editor: With this amazing element, you will have the capacity to embed any sort of structures to your page and plan it, for example, contact forms, feedback, requests or get a quote form. With unending styling choices, you can make forms like a genius.

Post element: The post element you can show the title, the post meta and the extract. Worth to make reference to, you can utilize it with any of your custom post composes, not just the ordinary posts.

Here you can download free elementor pro latest version under gpl (General Public license) license. This is educational purpose only. For commercial use, We highly recommend buy Elementor pro directly on plugin author-> Elementor.com

Elementor pro Features:
  • Customize your header & footer
  • Premium media widgets
  • Design every part of your blog
  • Build advanced, dynamic websites visually
  • Get control over your theme without code
  • Full set of social media widgets
  • Menu widget, search bar and more
  • Comprehensive single post widgets
  • Marketing & conversion widgets
  • Build high converting forms on the frontend
  • Design your form like never before
  • Integrate to your favorite marketing tools
  • Advanced form fields
  • Spam filter and protection
  • Advanced post filtering
  • Beautiful classic, portfolio and cards skin
  • Works on any custom post type
  • Endless grid layout & style options
  • Customize your single product & product archive pages
  • 18 Dynamic WooCommerce Widgets
  • Add Products & Categories to your pages
  • Design unique sales pages
  • Price Table & Price list
  • Slides & carousels
  • Global Widget
  • Sticky elements
  • Embed Anywhere
  • Custom Field Integration
  • Live Custom CSS
  • Custom Fonts
  • Adobe Fonts
  • Role Manager

GlobeTM Download advantages:
  • Exact Same copy or Files Being Distributed By Elementor
  • We Purchased And Download it From Original Developers
  • You’ll Receive Untouched And Unmodified copies or Files
  • 100% Risk Free From Virus or Malware Script or Backdoor
  • Freedom To Use On Unlimited Sites

WordPress Elementor pro plugin is an Exact Copy of Elementor pro Plugin distributed by Elementor. Here you can download free Elementor Pro plugin under GPL license. Educational purpose only. No registration needed or no subscription. For commercial Purpose we highly recommend purchase from Developers.

Freethub is not affiliated or in any way to related third-party developers or trademark owners, including: WordPress, WooCommerce, WooThemes, Yoast, etc.

Download Here!

Elementor Pro Plugin


    How to publish or share blogger post automatically in facebook and twitter


    Sharing blog post to your social media gain more traffic to your site!

    Are you tired of copying all your blog  post one by one and paste it to your Facebook,Facebook page or even to your Twitter account? Tired of searching on how you automatically share your blog post your social media account? Well you are in a right place, I will teach you how to publish your blog post automatically to your social media account such as Facebook, Facebook page and Twitter. You don't need a software or a knowledge in programming to do this.


    Steps on how to publish blog post to your Facebook, Facebook page and Twitter.
    1. Create a free account to IFTTT. Click Sign up

    2.After you created a new account click Search and type blogger and choose any of the three you want to connect to your social media account. 


    3. I choose Share your blog posts to your Facebook page click Turn on and configuration will appear. In Link URL you can and your desired ingredient such as PostTittle, PostURL, or PostContent, Then click Save.

    4. This will appear after you successfully save your applets. Now create a new blog post to your blogger and see if your blog post successfully share or publish to your social media account.


    Let me know if you have other tips to publish your blog post to your social media account aside from this and share it via our comment section, also don't forger to share and subscribe!